

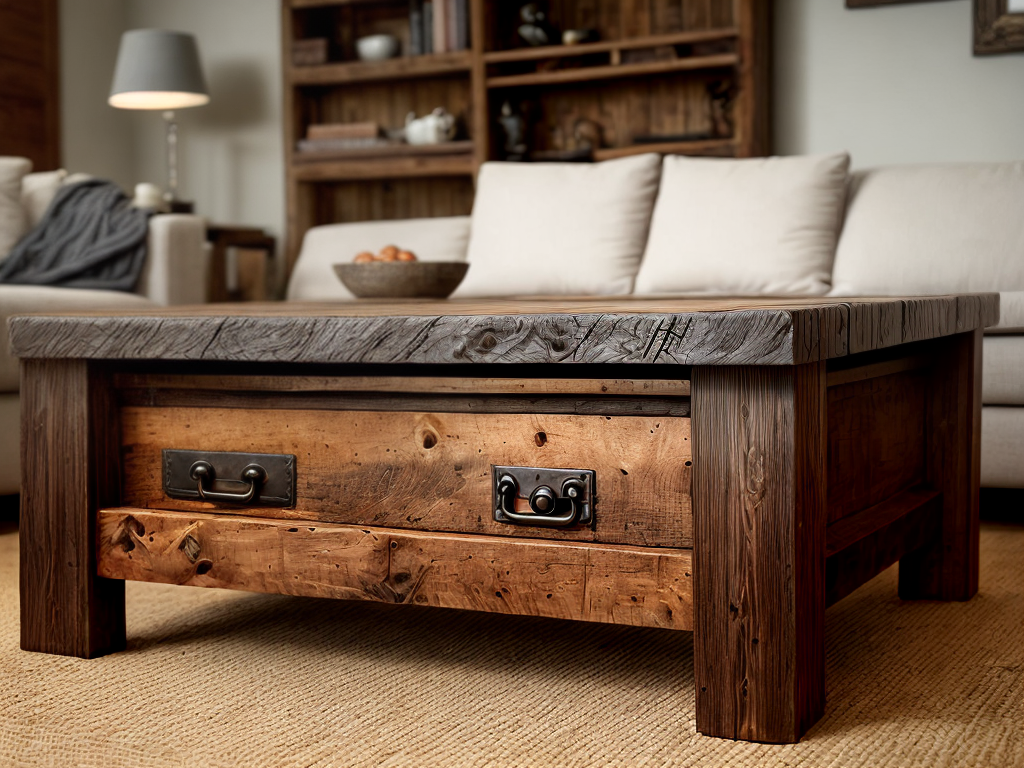
As I sat admiring the warm, rustic charm of my neighbor’s custom coffee table, crafted from reclaimed wood, I couldn’t help but be inspired. The thought of creating my own unique piece, infused with history and character, was tantalizing. Little did I know that this project would take me on a journey of creativity, craftsmanship, and a newfound appreciation for the beauty of repurposed materials. But before I could embark on this endeavor, there were crucial decisions to be made and careful planning to be done.
Choosing the Right Reclaimed Wood
When selecting the perfect reclaimed wood for my custom coffee table, I carefully consider its quality, character, and sustainability. One of the key factors in choosing the right reclaimed wood is the type of finish it has. There are various types of finishes available for reclaimed wood, each with its own unique look and feel. From natural oil finishes that enhance the wood’s natural beauty to distressed finishes that add a rustic charm, the choice of finish can greatly impact the overall aesthetic of the table.
In addition to the finish, finding reliable reclaimed wood suppliers is crucial. It is important to source the wood from reputable suppliers who specialize in reclaimed materials. These suppliers often have a wide variety of reclaimed wood options to choose from, ensuring that I can find exactly what I need for my coffee table project. Furthermore, working with reputable suppliers ensures that the wood has been properly salvaged and processed, meeting the highest standards of sustainability.
Designing and Planning Your Coffee Table
After carefully choosing the right reclaimed wood with the perfect finish, I am ready to begin designing and planning my custom coffee table. The designing process is where I get to let my creativity flow and turn my vision into reality. First, I need to decide on the dimensions of my coffee table. Will it be a small and compact piece or a larger, more statement-making centerpiece? This decision will depend on the size of my living space and the intended use of the table.
Next, I need to consider the style and aesthetic of the coffee table. Do I want a rustic and farmhouse-inspired look or a more modern and sleek design? This will help me in selecting materials that align with my desired style. I can choose to incorporate other elements such as metal accents or glass tops to enhance the overall look. Additionally, I need to think about the functionality of the coffee table. Will I need storage space for books or magazines? Should it have a lower shelf for additional display options?
Gathering the Necessary Tools and Materials
To build a custom coffee table, I will gather all the necessary tools and materials. It is important to have the right tools at hand to ensure a smooth and efficient building process. Additionally, exploring alternative materials can add a unique touch to your coffee table design. Here are some tips for using power tools effectively and a list of essential tools and materials you will need:
| Tools | Materials |
|---|---|
| Circular saw | Reclaimed wood |
| Power drill | Wood glue |
| Orbital sander | Screws |
| Clamps | Wood stain |
| Measuring tape | Polyurethane sealant |
When using power tools, it’s crucial to prioritize safety. Always wear protective gear, such as safety goggles and gloves, and make sure you understand how to operate each tool properly. Before starting, measure and mark the wood accurately to ensure precise cuts. When using a circular saw, support the wood securely to prevent any movement. Additionally, remember to sand the wood after cutting to achieve a smooth finish. Lastly, when assembling the table, apply wood glue to ensure a sturdy construction, and use clamps to hold the pieces together while the glue dries. By following these tips and gathering the necessary tools and materials, you’ll be well-equipped to create a beautiful custom coffee table.
Step-by-Step Assembly Instructions
I will now guide you through the step-by-step assembly instructions for building your custom coffee table. Follow these simple steps to bring your reclaimed wood coffee table to life:
- Prepare the table legs and frame: Start by attaching the legs to the frame using screws or nails. Ensure the legs are evenly spaced and securely fastened for stability.
- Attach the tabletop: Carefully place the reclaimed wood planks onto the frame, aligning them evenly. Secure the planks to the frame using screws or nails, ensuring they are tightly fastened.
- Sand and finish: Use sandpaper to smooth out any rough edges or surfaces. Apply a stain or finish of your choice to protect the wood and enhance its natural beauty.
- Troubleshooting common assembly problems: If you encounter any wobbling or instability, double-check that all screws and nails are tightly secured. Adjust the legs or frame if necessary.
- Tips for adding unique accents or details: Get creative with your coffee table by adding unique accents or details. Consider attaching decorative metal corners, adding a glass top, or even incorporating a hidden storage compartment.
Finishing and Sealing Your Custom Coffee Table
Now let’s move on to the final step in bringing your custom coffee table to life – applying the finishing touches and sealing the wood. Protecting the wood is crucial to ensuring the longevity and beauty of your table. One effective way to do this is by applying a clear coat.
A clear coat serves as a protective barrier, shielding the wood from scratches, spills, and sun damage. It also enhances the natural beauty of the wood, giving it a smooth and polished appearance. To apply a clear coat, follow these simple steps:
-
Prepare the surface: Ensure that the wood is clean and free of dust or debris. Sand the surface gently to smooth out any imperfections.
-
Choose the right clear coat: Select a clear coat that is specifically designed for wood. There are various options available, such as polyurethane, lacquer, or varnish. Consider factors like durability and the desired finish.
-
Apply the clear coat: Use a brush or a foam applicator to evenly coat the wood. Start from one end and work your way across, following the grain. Allow the first coat to dry completely before applying additional coats, if needed.
-
Sand between coats: For a smoother finish, lightly sand the surface between coats. This will help to remove any imperfections and create a seamless look.
-
Let it cure: Once all coats are applied, allow the clear coat to cure for the recommended time specified by the manufacturer. This will ensure that the protective layer is fully formed.


